Print Barcode Labels (Library Manager)
Destiny lets you print copy barcodes for a group of used or unused labels. Or if you want to manipulate data, you can export to Excel.
|
Notes:
|
|
Important: The first time you print barcodes, test them for usability. |
Used (Assigned) Barcode Labels
Used (assigned) labels contain the copy's scannable barcode, the barcode number, and any of the four optional fields:
- Site or district name
- Title (up to 20 characters)
- Author (up to 20 characters)
- Call number (up to 30 characters)
To generate used (assigned) copy barcodes:
- Select Reports > Library Reports.
- Under Labels, click Barcode Labels.
- Click the Used tab. The report setup page appears.
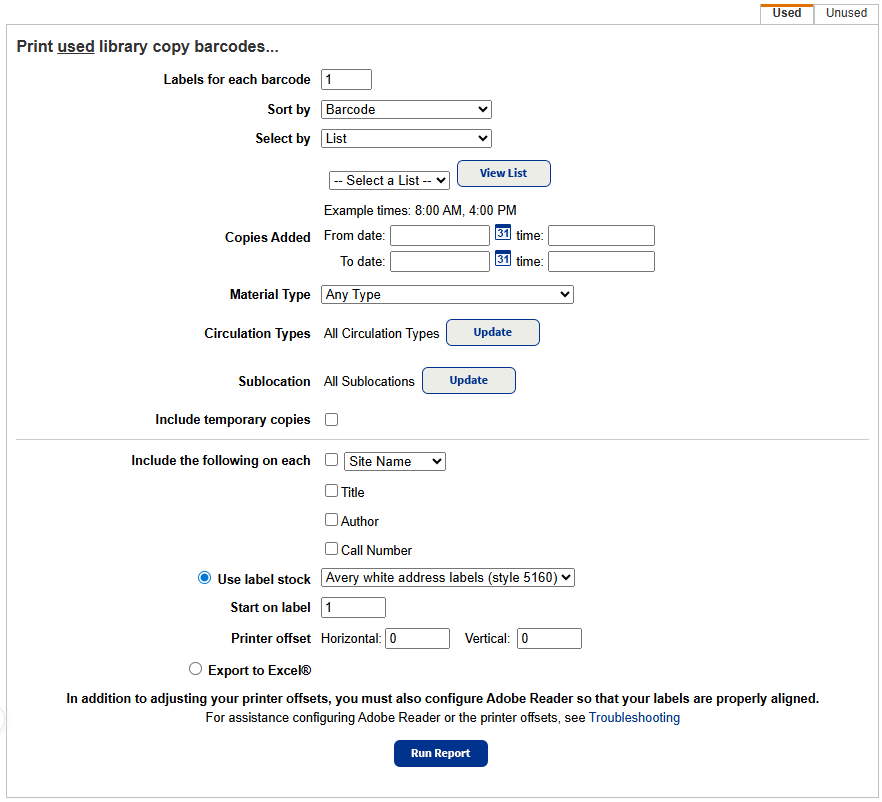
- Use the following table to fill in the fields:
Field Description
At Note: This drop-down only appears at the district level. Use the drop-down to select the district or a single library.
Note: If you select the district, printing is limited to the first 1,000 qualifying barcode labels. Labels for each barcode If you want more than one barcode label for each copy, change the quantity. Group by Note: This drop-down only appears at the district level. If you are running the report at the district level, select the checkbox to Group by Site, if desired.
Sort by Choose how you want the labels sorted:
- Barcode
- Author/Title
- Call Number/Author
- Title/Author
- Date/Time Copies Added
Select by Select a method for identifying the copies to include:
- List: If you have multiple Resource Lists, select the one needing the labels.
To review the contents of the Resource List, click View List. - Copy Category: Select a copy category from the list.
- Barcode List: Either create a new list, or select an existing barcode file:
Note: You cannot select Barcode List at the district level.
To create a new list, place the cursor in the Create a barcode list field and scan the barcodes, or type them and click Add. (To remove a barcode number from the list, select it and click Remove.)
To select an existing file, click Browse to find and select your file.
- Barcode Range: Enter the barcode range. Destiny prints only barcodes that are in use; it skips any barcodes in the range that are unused.
Notes:
- You cannot select Barcode Range at the district level.
- You can limit to one barcode or a range.
- All barcodes: Leave both fields blank.
- One barcode: Enter the same barcode in both fields.
- Up to and including a specific barcode: Leave the first field blank, and enter a barcode in the to field.
- A specific barcode and all those after it: Enter a barcode in the first field, and leave the to field blank.
- You cannot use wildcards (?, *) in ranges.
Copies Added: Enter beginning and ending dates to print barcodes for all copies added to Destiny during that time frame. Adding the time is optional.
Notes:
- Click the calendar icon for a calendar.
- Optionally, enter the time in the following format: <hour>:<minute> (7:00).
- If you chose List or Copy Category, entering a date and time is optional. This lets you further limit the printing. If you leave the date field blank, Destiny ignores the dates copies were added.
Material Type To limit the labels to copies of a single material type, select it from the drop-down. Circulation Type
Note: You cannot limit by Circulation Types at the district level. To limit the labels to copies of one or more circulation types, click Update next to Circulation Types and select them. Include temporary copies Select the checkbox, if desired. Sublocation
To limit the labels by one or more sublocations, click Update next to Sublocation and then select them.
Note: If you are running the report at the district level, the Sublocation limiter only appears if a single site was selected from the For drop-down.
Include the following on each Select any of the checkboxes to include additional information on the labels. Note: Barcode labels always have the scannable barcode and the barcode number. - Select the output:
If you want to... Then... Print on labels - Select Use label stock.
-
Use the drop-down to choose one of the preloaded label stocks.
Note: Stock from other vendors may not work as well. Make sure to print a test page on plain paper.
- To continue using partially-used label sheets, enter the number of the next available label in the Start on label field.
- If necessary, set the printer offsets to fine-tune the printing alignment on the barcode labels.
Manipulate the generated report data Select Export to Excel. - Click Run Report.
- When the Report Manager opens, click View. The report opens in a browser.
- Do one of the following:
If you want to... Then... Download the label sheet Click  .
.Print the labels - Position the label stock in your printer.
- Click .
- Set the print settings.
Important: Set to:
- Scale at 100%.
- Print on one side.
- Click Print.
Unused (Unassigned) Barcode Labels
Unused (unassigned) labels contain the copy's scannable barcode, the barcode number, and, if selected, the site or district name.
Unused labels are printed in barcode number order.
To generate unused (unassigned) library copy barcodes:
- Select Reports > Library Reports.
- Under Labels, click Barcode Labels.
- Click the Unused tab. The report setup page appears.
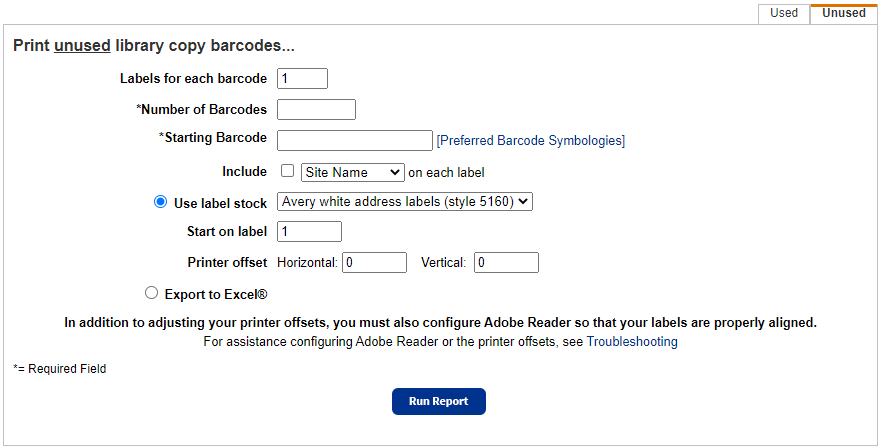
- Use the following table to fill in the fields:
Field Description
At Note: This drop-down only appears at the district level. Use the drop-down to select the district or a single library.
Note: If you select the district, printing is limited to the first 1,000 qualifying barcode labels. Labels for each barcode If you want more than one barcode label for each copy, change the quantity. Number of Barcodes Enter the quantity of labels needed.
Notes:
- You can enter your highest barcode, or, fill gaps in your number sequence by entering a lower number. Destiny prints only barcode numbers that are not in use; it skips any used barcode numbers.
- To identify (and copy, if desired) the next available barcode number, click Preferred Barcode Symbologies next to Starting Barcode field.
- If the barcode number you enter is more than 7 characters, its symbology must match the symbology that appears in brackets. If it does not, you will need to change the symbology in Admin > Site Configuration before generating the labels.
Starting Barcode Enter the barcode number you want to start with.
Notes: - You can enter your highest barcode, or, fill in gaps in your number sequence by entering a lower number. Destiny prints only barcode numbers that are not in use; it skips any used barcode numbers.
- To identify (and copy, if desired) the next available barcode number, click the symbology name next to the Starting Barcode field.
- If the barcode number entered is more than 7 characters, its symbology must match the symbology that appears in brackets. If it does not, change the symbology in Admin > Site Configuration before generating the labels.
Include Select the checkbox, and use the drop-down to print your district or site name on the label. - Select the output:
If you want to... Then... Print on labels - Select Use label stock.
-
Use the drop-down to choose one of the preloaded label stocks.
Note: Stock from other vendors may not work as well. Make sure to print a test page on plain paper.
- To continue using partially-used label sheets, enter the number of the next available label in the Start on label field.
- If necessary, set the printer offsets to fine-tune the printing alignment on the barcode labels.
Manipulate the generated report data Select Export to Excel. - Click Run Report.
- When the Report Manager opens, click View. The report opens in a browser.
- Do one of the following:
If you want to... Then... Download the label sheet Click .Print the labels - Position the label stock in your printer.
- Click .
- Set the print settings.
Important: Set to:
- Scale at 100%.
- Print on one side.
- Click Print.