Add patron records manually
Each Destiny user is considered a patron and must have a patron record that associates them with the materials they check out, fines they incur, and any patron transactions.
Typically, you add a patron when either:
- You do not have a data source system, such as a student information system.
- A student or patron is not currently in the data source system.
|
Note: If a faculty member performs duties at multiple sites or a student attends classes at more than one school, those patrons may be associated with multiple sites. |
Add a new patron
Before you add a patron record, always search the district’s patron database to make sure a patron record doesn’t already exist.
- You can search for a patron in two ways:
- Select Patrons > Search.
- Select Admin > Manage Patrons.
- To search across the district and include inactive patrons, do the following:
- From Patrons > Search, deselect Only active patrons and Only my patrons.
- From Admin > Manage Patrons, select Search across the district and Only Active Patrons.
- Search for the patron.
Note: If you find a matching patron record, do not add a new one. Check whether the patron's Status is Active. If the patron record is associated with another site, you can transfer them or associate them with multiple sites.
- If no patron record exists for that user, click + Add New Patron.
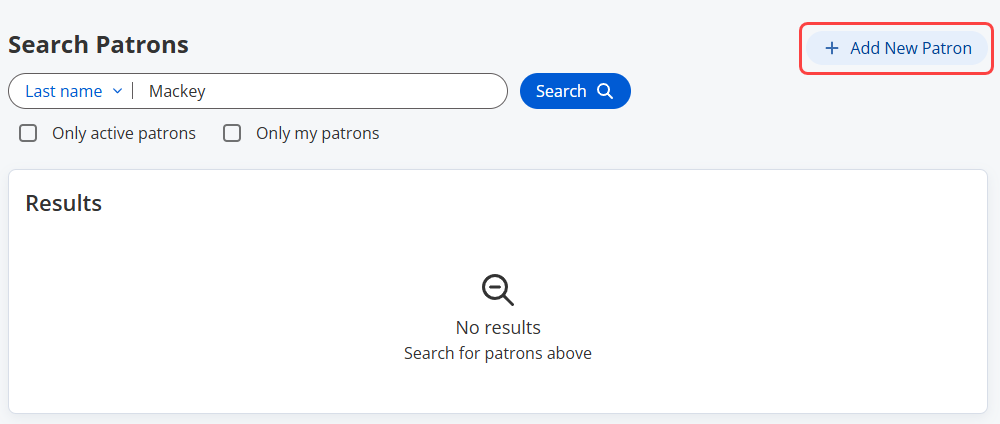
Note: The preceding image shows the Search Patrons page (Patrons > Search). If you are on the Manage Patrons page (Admin > Manage Patrons), Add New Patron also appears in the top-right.
- Click the General tab.
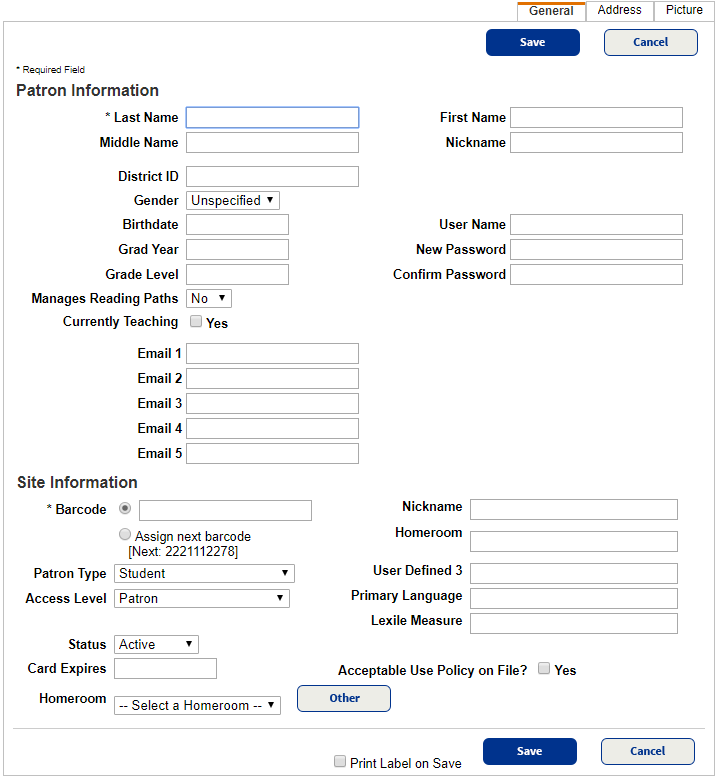
Follett recommends you complete as many of the patron and site information fields as possible; however, here are a few things to note:
- Only the patron’s last name and barcode number fields are required.
- The barcode number must be unique at the school.
- If you use a district ID number, it must be unique across the district.
- Destiny supports up to five email addresses per patron and lets you send notices to patrons and parents. The prompts for email addresses can be defined and pushed from the district.
- Patrons with a username and password log in to Destiny to get access to a range of features and functionality.
- A patron who does not log in to Destiny is called a Guest and has access only to basic functionality, such as searching.
- Follett requires that you assign a patron type and access level.
- The patron type you select controls patrons’ loan policies and can be used as a limiter when creating patron notices and circulation reports.
- The access level controls the functions that patrons can perform in Destiny.
- The Site Information section also has five user-defined fields. Unless district policies define these fields, they are site-specific and vary for each school. It is important to check with the Destiny Administrator regarding district policies before entering data in these fields.
Note: A District Patrons Manager or users with the Search for patrons across the district permission can add site associations and globally associate patrons with sites. District users see an +Add Additional Site button. If you add an additional site, the Site Information section lists both sites.
- To print a patron barcode when you save, select Print Label on Save.
- (Optional) Add address information by clicking the Address tab or a picture by clicking the Picture tab.
Note: To learn more, see Add a patron picture.
- When you have entered all the information for a patron, click Save.